MaxScheduler can work with Quickbooks software. It imports sales data from Quickbooks that can be seen through menu Reports | Sales | Sales by Customer Detail. The imported data covers a date range of the previous and current day. The information appears in the List View to schedule business activities.
Before trying to get data from Quickbooks make sure Quickbooks is open and is in Single User Mode. Single User Mode is chosen through the File menu in Quickbooks.
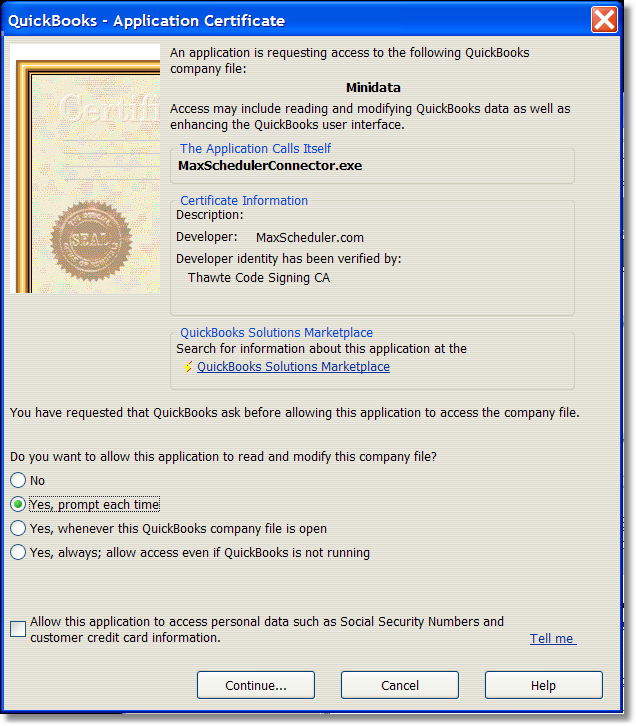
Quickbooks has embedded security to control access to information in Quickbooks. When another software program tries to access Quickbooks data, Quickbooks will display a security window with options for allowing access. A sample of this screen is shown below:

Here are the steps for importing Quickbooks data:
Step 1: Make sure Quickbooks is open and in Single User Mode (controlled in Quickbooks through the File menu).
Step 2: Start MaxScheduler and trigger the importing from MaxScheduler through menu File | Import data from Quickbooks. When you choose this option, a small dialog appears in MaxScheduler, click OK. Please note that the message states the date range that it will pull information from.

Step 3: An authentication screen will appear in Quickbooks, similar to authentication screen shown at the top of this page. It is asking to grant access to MaxScheduler to Quickbooks data. Only the user 'Administrator' can process the authentication screen. Choose the appropriate permission level you want to grant. There is a check box near the bottom for accessing "personal data" such as Social Security Numbers. You can leave this unchecked. MaxScheduler doesn't try to import personal data. There is the option to grant access for all future requests by MaxScheduler. Note: MaxScheduler delays 3 minutes for acceptance of the security question. If the import doesn't work, this may be the reason.
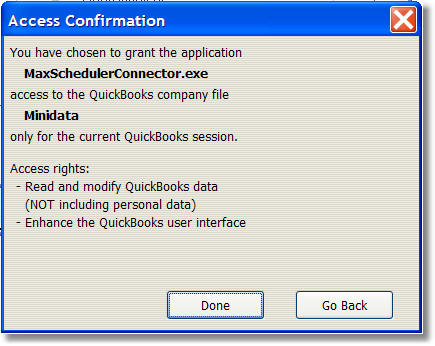
Step 4: If you choose to grant permission another dialog will appear. This screen describes that MaxScheduler is trying to retrieve information from a Quickbooks data file, in this case called 'Minidata':

Step 5: Once permission has been granted, the Quickbooks invoice data will appear in the List view. If there is an error with the import from Quickbooks, the Quickbooks error message will appear in MaxScheduler. Contact us to help if you run into problems.
MaxScheduler imports sales data for a date range about the current date. By default MaxScheduler pulls in sales data for the current day (schedule start date) and the previous day. The date range can be adjusted in MaxScheduler through menu Configuration | Edit general application attributes. There are two parameters. 'Quickbooks import before today gap' specifies number of days in the past. 'Quickbooks import before today gap' specifies number of days in the future. The two numbers are combined about the current date to specify the date range. By adjusting the mentioned parameters you can expand or shrink the date range.